Annie went back to Boston to this! Awesome was how she described it, and I must say I am a little jealous! I grew up with 4 seasons, and I miss them! In southern California, we have almost summer, summer, and just past summer (and 1 week of cold). It is 91 degrees here today, which is WAY TOO HOT for January!
I am working on the graph for the smocking design for the basic yoke dress that will be my tutorial that starts in February. I will have my new pattern in the next couple of weeks - Classic Yoke from Classic Couture for Children. I will be making the size 3, so the measurements I will be using will come from that. We will be starting with blocking the skirt front (th pleating tutorial is already posted).
I will post the fabric and notion requirements this week, along with information if you want to purchase the kit. My dress is smocked and I am diligently taking pictures of the condtructio every step of the way. I would much rather be sewing than doing the taxes! College kids abound at our house and they are all emaling me to remind me that they have to get their FAFSFA filled out. The one good thing about that is that I can just laugh on April 15th (and you will not catch me dead at the post office that day)!
Happy Stitching,
Vaune
Monday, January 17, 2011
Thursday, January 13, 2011
Mood Fabric, Here We Come!
A group of us decided to foray into Los Angeles for a field trip to Mood, a fabric store in L.A. You may be familiar with it - the New York store is the fabric playground for the contestants on the show "Project Runway".
Mood had a wonderful selection of quality fabrics. While you probably won't find Swiss batiste or voile, they have many cottons, silks, and wools, as well as leathers and other specialty fabrics. They had a wonderful collection of Ralph Lauren wools the day that we were there.
They also have some beautiful silks that are wove for ties. They are not quite as wide - 27" and 36", but some gorgeous prints and stripes. You can see here they also have some different trims that can add a bit of pizzazz to your garment.
Here are some of the silks. The store has silks on the left, wools in the center and cottons on the right, and then the fancy embroidered fabrics are towards the front.
More and more fabric! Make sure you do not come for 'just a minute'! As all of you fabricholics know, you have to touch and feel, and there is plenty to feed your stach here.
Button, button, who had the button? Plenty to choose from here!
Happy shoppers! Lisa Shepherd, Elaine Daly, Roseann Saldinger and Elisa Centera (I have the camera). Youcan also see the nice display of ribbon in the background, along with the feather boas. A wonderful place to have a play date!
This was one stop on our trip - I will save our other stop for another day. Needless to say, I have added more fabric to my stash and have lots of ideas spinning in my brain. If you are going to be in the LA area, let me know and I will give you address and directions.
Happy stitching,
Vaune
Mood had a wonderful selection of quality fabrics. While you probably won't find Swiss batiste or voile, they have many cottons, silks, and wools, as well as leathers and other specialty fabrics. They had a wonderful collection of Ralph Lauren wools the day that we were there.
They also have some beautiful silks that are wove for ties. They are not quite as wide - 27" and 36", but some gorgeous prints and stripes. You can see here they also have some different trims that can add a bit of pizzazz to your garment.
Here are some of the silks. The store has silks on the left, wools in the center and cottons on the right, and then the fancy embroidered fabrics are towards the front.
More and more fabric! Make sure you do not come for 'just a minute'! As all of you fabricholics know, you have to touch and feel, and there is plenty to feed your stach here.
Button, button, who had the button? Plenty to choose from here!
Happy shoppers! Lisa Shepherd, Elaine Daly, Roseann Saldinger and Elisa Centera (I have the camera). Youcan also see the nice display of ribbon in the background, along with the feather boas. A wonderful place to have a play date!
This was one stop on our trip - I will save our other stop for another day. Needless to say, I have added more fabric to my stash and have lots of ideas spinning in my brain. If you are going to be in the LA area, let me know and I will give you address and directions.
Happy stitching,
Vaune
Saturday, January 8, 2011
Trellis Stitch
Now it is time to learn the next stitch, the trellis stitch. While the cable travels in a straight line, the trellis travels between rows. A cable stitch is used as the pivot stitch, when the trellis changes direction. Each trellis is defined by 2 things:
1. The space it takes up (can be a half a space wide, a whole space, etc.)
2. The number of stitches or 'steps' it takes to go from one side to another.
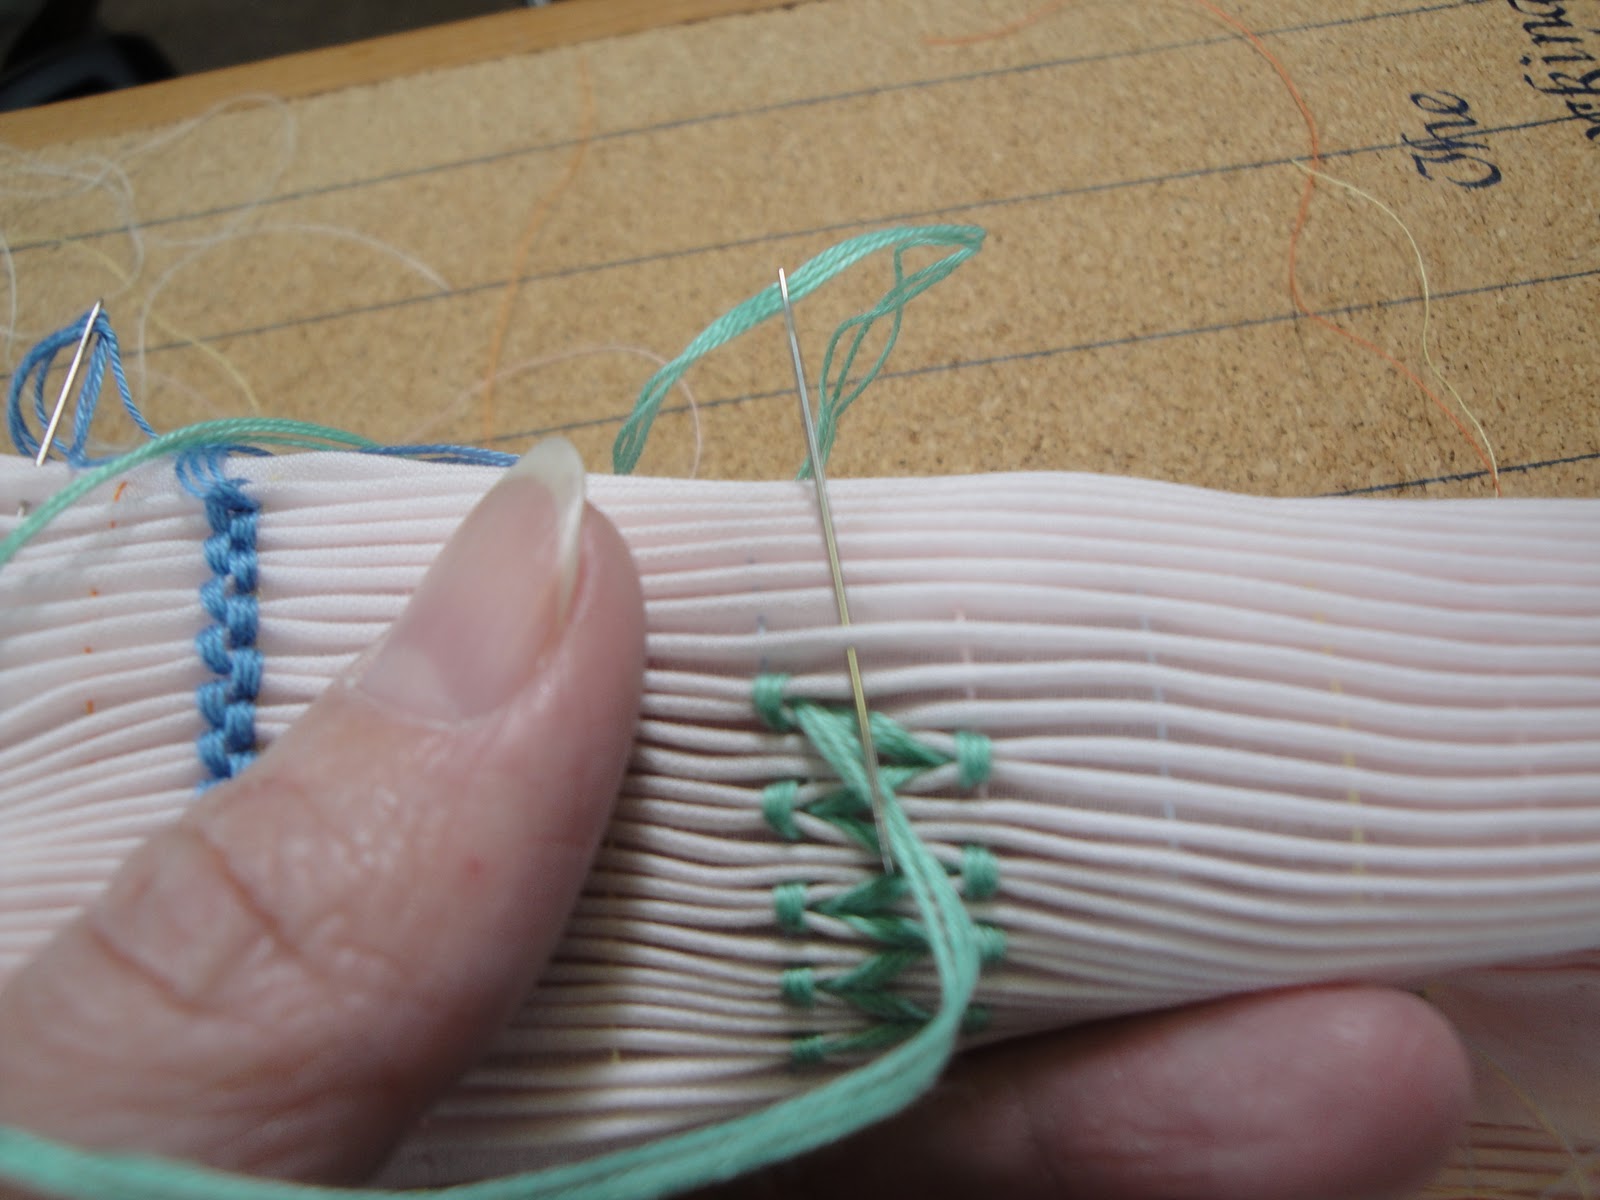
If you look at this picture, the long trellis is a 2 space (travels over 2 rows), 6 step (it takes 6 stitches to travel the 2 rows).
The distance each trellis travels is a half of a space and it only takes one step to get there.
There are few things to remember when stitching a trellis. The thread has to go in the opposite direction that it wants to go. If you are stitching to the right, the thread has to stay to the left. If you are stitching to the left, the thread has to stay to the right. An easy way to remember this is Trellis is Trouble!
If you look back at the cable tutorial, Cable is Correct! The thread goes in the direction it wants to go. For Trellis is Trouble, the thread has to go in the opposite direction that it wants to go.
Another thing that has to be taken into consideration is the needle placement in the pleat. If you place the needle right over the pleat, when the stitch is finished, instead of butting against the pleat, it will be over the pleating thread, whch will throw the spacing off. Place the needle in the pleat a thread's width away from where you want the stitch to finish.
Basic smocking ettiquette remains the same:
*The needle is alway parallel to the pleating thread
*The stitch should be about 1/3 down the pleat
*The threads should lie straight and untwisted
*The needle should always point towards you
*Each stitch covers 2 pleats- an old pleat and a new pleat
To start, we are going to stitch a one space, one stitch trellis (often called a wave). Hold the fabric over your finger, and stitch a left cable.
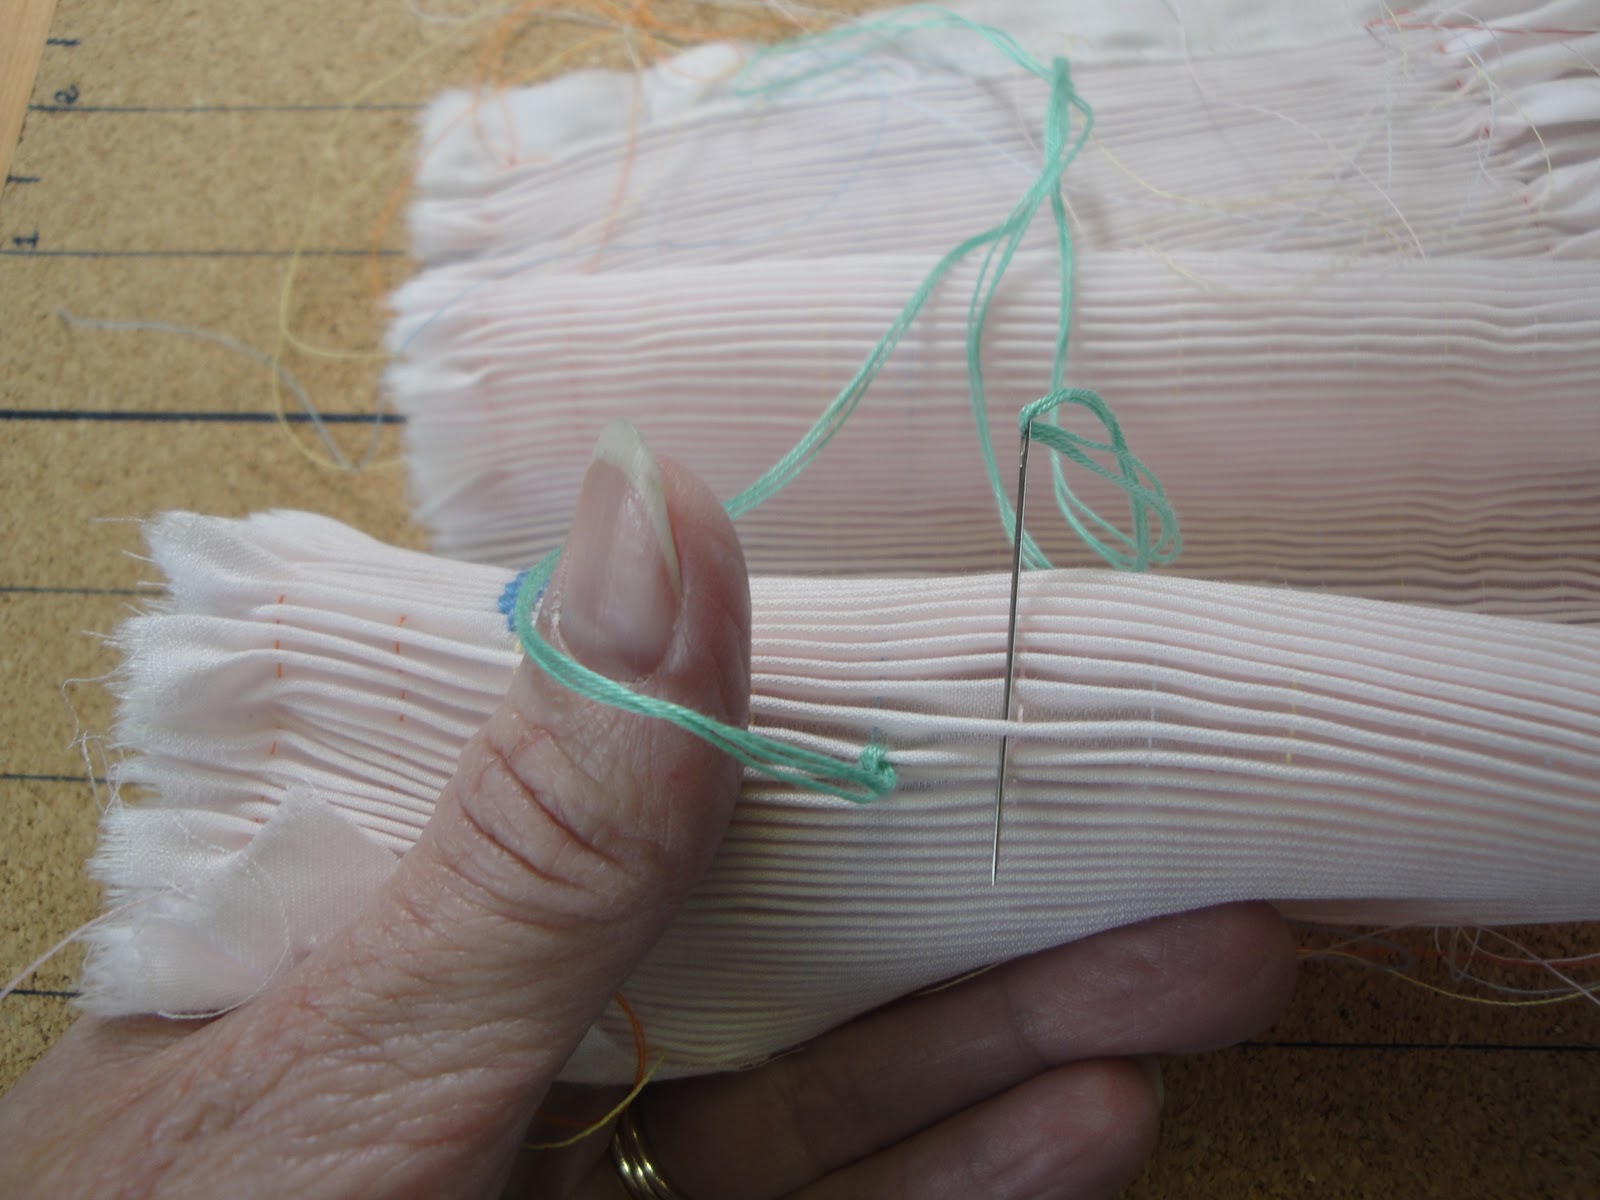
Run the threads over your thumb as you pull the stitch and make sure the threads are straight.
After the cable is stitched, move one space to the right. The thread will want to go the the right also, but you need to hold it off to the left (see picture). Remember to put the needle into the pleat a thread's width away so that when you complete the stitch, it will butt against the pleating thread.
Stitch the right cable (remember this is the pivot stitch where you change directions).
Now we are trellising to the left again. Remember to hold the thread to the right as we are moving to the left.
Stitch a left cable and continue trellising. Remeber to wrap the thread over your thumb and straighten the threads!
Here is a picture of several waves that I have stitched.
Starting a baby wave. That is a 1/2 space, 1 step trellis. Look at how I am placing my needle just short of 1/2 way - when I pull the stitch, it will end up being right in the middle.
Here is a picture of a completed baby wave. Now it is your turn! Remember - practice! If you have any questions, remember to post them to the comments and I will be sure to answer them.
Happy Stitching,
Vaune
1. The space it takes up (can be a half a space wide, a whole space, etc.)
2. The number of stitches or 'steps' it takes to go from one side to another.
If you look at this picture, the long trellis is a 2 space (travels over 2 rows), 6 step (it takes 6 stitches to travel the 2 rows).
The next picture is of a baby wave. This trellis is a half space, 1 step trellis
The distance each trellis travels is a half of a space and it only takes one step to get there.
There are few things to remember when stitching a trellis. The thread has to go in the opposite direction that it wants to go. If you are stitching to the right, the thread has to stay to the left. If you are stitching to the left, the thread has to stay to the right. An easy way to remember this is Trellis is Trouble!
If you look back at the cable tutorial, Cable is Correct! The thread goes in the direction it wants to go. For Trellis is Trouble, the thread has to go in the opposite direction that it wants to go.
Another thing that has to be taken into consideration is the needle placement in the pleat. If you place the needle right over the pleat, when the stitch is finished, instead of butting against the pleat, it will be over the pleating thread, whch will throw the spacing off. Place the needle in the pleat a thread's width away from where you want the stitch to finish.
Basic smocking ettiquette remains the same:
*The needle is alway parallel to the pleating thread
*The stitch should be about 1/3 down the pleat
*The threads should lie straight and untwisted
*The needle should always point towards you
*Each stitch covers 2 pleats- an old pleat and a new pleat
To start, we are going to stitch a one space, one stitch trellis (often called a wave). Hold the fabric over your finger, and stitch a left cable.
Run the threads over your thumb as you pull the stitch and make sure the threads are straight.
After the cable is stitched, move one space to the right. The thread will want to go the the right also, but you need to hold it off to the left (see picture). Remember to put the needle into the pleat a thread's width away so that when you complete the stitch, it will butt against the pleating thread.
Stitch the right cable (remember this is the pivot stitch where you change directions).
Now we are trellising to the left again. Remember to hold the thread to the right as we are moving to the left.
Stitch a left cable and continue trellising. Remeber to wrap the thread over your thumb and straighten the threads!
Here is a picture of several waves that I have stitched.
Starting a baby wave. That is a 1/2 space, 1 step trellis. Look at how I am placing my needle just short of 1/2 way - when I pull the stitch, it will end up being right in the middle.
Here is a picture of a completed baby wave. Now it is your turn! Remember - practice! If you have any questions, remember to post them to the comments and I will be sure to answer them.
Happy Stitching,
Vaune
Friday, December 24, 2010
Start Smocking - Cables!
I am going to take you step by step through the process of starting your thread and beginning your smocking stitches! The process I use may be a bit different from what you are used to seeing, but using this technique allows me to see exactly where my needle enters the fabric and where it exits the fabric, which allows me to see where my stitch is going to be.
If you have questions, please post a comment and I will answer you. Chances are, if you have a questions, someone else might too, and that way everyone can see the question and answer.
Remember:
The needle is always parallel to the pleating thread
The needle should always be pointing towards you
The stitch should be plaed about 1/3 of the way down the pleat
Threads should be untwisted and lie side by side, next to each other
Once you have your fabric pleated, you are ready to start! To begin with, you need to choose a thread and needle. Some thread choices are cotton stranded embroidery floss 3 strands), floche (2 strands), and coton a broder #25 (2 strands). For your needle, I usually use an 8 embroidery needle or a 7 sharp needle.
When you start your thread on the fabric, you want your first stitch to look like it is 'the next' stitch. You don't want it to be obvious that you are starting. To get this effect, do the following:
1. Bring the needle up from the wrong side (back) of the fabric to the right side (top) of the fabric between the 2 pleats that you are going to use for your first stitch. (See picture above).
At this point you want to turn the fabric so that the pleating threads are running north to south. This is the way I hold my fabric when I am smocking. It helps me see better! The needle is always pointing towards me as I stitch. To hold you fabric so that it moves over your fingers:
Hold out your left forefinger (pointer) and put the finger under the pleated fabric
Put your second finger (tall man) over the fabric behind your first finger
Put your 3rd and 4th finger (ring man and pinkie) in front of the fabric, to the front of your first finger. When you hold your fabric like this, you can see into the side of each pleat so that ou know where your needle is entering and exiting each pleat and you can also check andmake sure that your needle is horizontal to the pleat.
This may be awkward, especially if you learned to smock from left to right!
All I can say is - give it a chance!
Right now, you have bright your thread from the wrong side to the right side through the valley between the two pleats of your first stitch, and then you turned your fabric. Next, you are going to bring your needle through the first pleat (the one on the bottom). Remember, the needle always points towards you, and the needle is always parallel to the pleating threads.
For this first stitch ( a cable) I am starting it just a needle's width away from the pleating thread. This will give me enough space for the thread in the stitch to lay butting against the pleating thread as I stithc along the row.
Something to remember about cables:
C is for Correct - in the cable stitch, the thread always wants to go the way it is supposed to go! If the cable lays to the right, then you are going to be doing a right cable, etc.
Now my thread is coming out of the first (old) pleat and then my needle is going to the next (new) pleat and the thread is to the right, so I am going to be stitching a right cable.
I am placing my needle:
parallel to the pleating thread
needle pointing towards me
stitch about 1/3 of the way down the pleat
As I pull the thread through the fabric, I catch the loop with my thumb, and my thumb kind of serves as a mini-press, to help keep the threads straight.
You can see my thumb is caught in the loop and I run my needle through the threads to sstraighten them out. If you look closely, you can see 3 threads lying next to each other. If the threads are twisted, you will see one big thread instead of 3 separate threads.
When you pull the thread to make the first cable stitch, the stitch will butt against the pleating thread and the embroidery thread will now be going to the left. Your next stitch will be a left cable stitch.
Next stitch - a left cable! Thread to the left, your needle is coming out of the old pleat and into a new pleat, with the needle pointing toward you and parallel to the pleating thread. The needle goes into the new pleat a threads width away from the pleating thread.
Now ready for the next cable! The thread is off to the right, so we will be stitching a right cable. Same process:
Needle points toward you
Needle is parallel to the pleating thread
Needle is put placed about 1/3 of the way down the pleat
Repeat the steps for the left cable and the right cable until you have stitched the required amount.
A perfect row of cables!
Remeber - if you have questions, please post them so all can see! I will be posting lessons on Fridays, so hopefully youwill have a bit of free time on the weekend to spend a bit of time on them. Anything that is posted I will try to have posted before the next lesson.
Happy Stiching!
Vaune
If you have questions, please post a comment and I will answer you. Chances are, if you have a questions, someone else might too, and that way everyone can see the question and answer.
Remember:
A smocking stitch always takes to pleats -
an old pleat (the needle and thread are coming out of)
a new pleat (the needle is going into)The needle is always parallel to the pleating thread
The needle should always be pointing towards you
The stitch should be plaed about 1/3 of the way down the pleat
Threads should be untwisted and lie side by side, next to each other
Once you have your fabric pleated, you are ready to start! To begin with, you need to choose a thread and needle. Some thread choices are cotton stranded embroidery floss 3 strands), floche (2 strands), and coton a broder #25 (2 strands). For your needle, I usually use an 8 embroidery needle or a 7 sharp needle.
When you start your thread on the fabric, you want your first stitch to look like it is 'the next' stitch. You don't want it to be obvious that you are starting. To get this effect, do the following:
1. Bring the needle up from the wrong side (back) of the fabric to the right side (top) of the fabric between the 2 pleats that you are going to use for your first stitch. (See picture above).
At this point you want to turn the fabric so that the pleating threads are running north to south. This is the way I hold my fabric when I am smocking. It helps me see better! The needle is always pointing towards me as I stitch. To hold you fabric so that it moves over your fingers:
Hold out your left forefinger (pointer) and put the finger under the pleated fabric
Put your second finger (tall man) over the fabric behind your first finger
Put your 3rd and 4th finger (ring man and pinkie) in front of the fabric, to the front of your first finger. When you hold your fabric like this, you can see into the side of each pleat so that ou know where your needle is entering and exiting each pleat and you can also check andmake sure that your needle is horizontal to the pleat.
This may be awkward, especially if you learned to smock from left to right!
All I can say is - give it a chance!
Right now, you have bright your thread from the wrong side to the right side through the valley between the two pleats of your first stitch, and then you turned your fabric. Next, you are going to bring your needle through the first pleat (the one on the bottom). Remember, the needle always points towards you, and the needle is always parallel to the pleating threads.
For this first stitch ( a cable) I am starting it just a needle's width away from the pleating thread. This will give me enough space for the thread in the stitch to lay butting against the pleating thread as I stithc along the row.
Something to remember about cables:
C is for Correct - in the cable stitch, the thread always wants to go the way it is supposed to go! If the cable lays to the right, then you are going to be doing a right cable, etc.
Now my thread is coming out of the first (old) pleat and then my needle is going to the next (new) pleat and the thread is to the right, so I am going to be stitching a right cable.
I am placing my needle:
parallel to the pleating thread
needle pointing towards me
stitch about 1/3 of the way down the pleat
As I pull the thread through the fabric, I catch the loop with my thumb, and my thumb kind of serves as a mini-press, to help keep the threads straight.
You can see my thumb is caught in the loop and I run my needle through the threads to sstraighten them out. If you look closely, you can see 3 threads lying next to each other. If the threads are twisted, you will see one big thread instead of 3 separate threads.
When you pull the thread to make the first cable stitch, the stitch will butt against the pleating thread and the embroidery thread will now be going to the left. Your next stitch will be a left cable stitch.
Next stitch - a left cable! Thread to the left, your needle is coming out of the old pleat and into a new pleat, with the needle pointing toward you and parallel to the pleating thread. The needle goes into the new pleat a threads width away from the pleating thread.
Again, catch the loop with your thumb and use the needle to make sure the threads are straight.
Once everything is as it should be, complete the stitch. This stich will NOT butt against the pleating thread - it will be a bit to the left of the original stitch. The next stitch (a right cable) and every right cable will butt against the pleating thread.
Needle points toward you
Needle is parallel to the pleating thread
Needle is put placed about 1/3 of the way down the pleat
Repeat the steps for the left cable and the right cable until you have stitched the required amount.
A perfect row of cables!
Remeber - if you have questions, please post them so all can see! I will be posting lessons on Fridays, so hopefully youwill have a bit of free time on the weekend to spend a bit of time on them. Anything that is posted I will try to have posted before the next lesson.
Happy Stiching!
Vaune
Tuesday, December 21, 2010
Introducing................Violet Grace!
I'd like to introduce you to Violet Grace! It will be nice to have a name for my 3T dress form! I am heading to LA next week to wrap up my Basic Yoke pattern, and Violet Grace will be going with me!
And congratulations to Joyce Ross from the Baltimore area - she submitted Violet Grace and is the winner of 10 skeins of coton a broder #25. She belongs to the Chesapeake Treasures SAGA Guild - I taught for their group and had a loely time! These will bo out in the mail - enjoy! For those of you who submitted a name and it was not the one drawn out of the hat, don't despair. I have a 12 month dress form that needs to be names and will ask for names again in the spring.
Next post will be cables, followed by baby waves and then smocking and constructing a basic yoke dress.
My chickies are starting to head home to roost! Annie got home this afternoon - about 12 hours late. her flight out of Boston was delayed, so she spent the night in the Atlanta airport (you ca do that when you are young!). Nathan (#2) is already home and Zak (#1) will be home Christmas Eve morning. We have a short 36 hours when everyone is home at the same time, but 36 hours is better than none!
I hope you all have a wonderful holiday and get to spend time with loved ones and friends. Be happy and safe, and
Happy Stitching!
Vaune
Sunday, December 12, 2010
Pleating
Before you can smock, you have to have a piece of pleated fabric to work on! The easiest and quickest way to do pleat something is with a pleater (vs. pleating by hand). To get started, I have my pleater needles in my pleater. At this point, I will put as many needles as I need (one needle = one row of pleating) and make sure they are nice and straight. Bent needles can cause them to pop out of the pleater bars and can be very frustrating.
The next thing I like to do, especially if I have not pleated anything in a while, is to run a piece of wax paper through my pleater. Please note that the needles are NOT threaded at this point! I take a piece of wax paper that is about 12 inches long and 'pleat' it. This helps to lubricate the needles and the fabric seems to glide right through. You can save the wax paper and use it again.
Thread your pleater needles. I have my pleater sitting on a Thread Caddy - it helps me keep my threads untangled, especially if I am doing a lot of pleating (kits for a class, etc.). Thread the same number of needles as rows of pleats that you need, and don't forget your holding rows! I like to have 2 holding rows at the top and one at the bottom for a total of 3 holding rows.
Note: to help guide your fabric through, I usually follow the guide for the next full space row that is not threaded. As you can see, I have 15 needles threaded, so I lined the fabric up with row 16 and used that as a guideline.
Once you know where to line up your fabric, start it through the pleater. It does help to have 3 hands (or a kid or a husband), but lacking those, it is possible to feed the fabric through evenly. Remember this is not a race! It also helps to know your pleater. I have several pleaters that I use, and they each have their own personality. The more you pleat, the more you will get to know your pleater. Don't be afraid to pleat something for practice!
Note: I pleat with the needles in the front, the handle on the right side with the fabric feeding through from the back. That is the way I learned! I know there are people who pleat with the handel on the right, the fabric going away from them. There is not really a right or wrong way - whatever is most comfortable for you.
As the needles fill with fabric, pull the pleats off and then pleat again until the needles are full. Repeat this until all the fabric has been fed through the pleater. Remember, slow and steady! Watch the fabric and keep it straight so that the pleating theads are on grain!
Once the fabric is pleated, CAREFULLY pull the thread out of the needles. Make sure you are pulling out the end that is not still attached to the spool. Once all of the needles are unthreaded, pull the pleated piece out so there is (at least) a good 18 inches of thread at the pleater end. It is better to have too long than too short! You should now have long tails of thread at each side of the pleated fabric. At this point, cut the threads, and tah dah! your pleated piece of fabric!
Next lesson is blocking the fabric.
Don't forget to name my size 3 dress form! I have had some cute names come in - drawing is soon!
Happy Stithcing (and pleating)!
Vaune
The next thing I like to do, especially if I have not pleated anything in a while, is to run a piece of wax paper through my pleater. Please note that the needles are NOT threaded at this point! I take a piece of wax paper that is about 12 inches long and 'pleat' it. This helps to lubricate the needles and the fabric seems to glide right through. You can save the wax paper and use it again.
Thread your pleater needles. I have my pleater sitting on a Thread Caddy - it helps me keep my threads untangled, especially if I am doing a lot of pleating (kits for a class, etc.). Thread the same number of needles as rows of pleats that you need, and don't forget your holding rows! I like to have 2 holding rows at the top and one at the bottom for a total of 3 holding rows.
Note: to help guide your fabric through, I usually follow the guide for the next full space row that is not threaded. As you can see, I have 15 needles threaded, so I lined the fabric up with row 16 and used that as a guideline.
Once you know where to line up your fabric, start it through the pleater. It does help to have 3 hands (or a kid or a husband), but lacking those, it is possible to feed the fabric through evenly. Remember this is not a race! It also helps to know your pleater. I have several pleaters that I use, and they each have their own personality. The more you pleat, the more you will get to know your pleater. Don't be afraid to pleat something for practice!
Note: I pleat with the needles in the front, the handle on the right side with the fabric feeding through from the back. That is the way I learned! I know there are people who pleat with the handel on the right, the fabric going away from them. There is not really a right or wrong way - whatever is most comfortable for you.
As the needles fill with fabric, pull the pleats off and then pleat again until the needles are full. Repeat this until all the fabric has been fed through the pleater. Remember, slow and steady! Watch the fabric and keep it straight so that the pleating theads are on grain!
Once the fabric is pleated, CAREFULLY pull the thread out of the needles. Make sure you are pulling out the end that is not still attached to the spool. Once all of the needles are unthreaded, pull the pleated piece out so there is (at least) a good 18 inches of thread at the pleater end. It is better to have too long than too short! You should now have long tails of thread at each side of the pleated fabric. At this point, cut the threads, and tah dah! your pleated piece of fabric!
Next lesson is blocking the fabric.
Don't forget to name my size 3 dress form! I have had some cute names come in - drawing is soon!
Happy Stithcing (and pleating)!
Vaune
Thursday, December 2, 2010
Christmas Baking!
December is here and I have started my holiday baking! Mrs. Marshall, one of my mother's friends, used to make a bunch of these for our church bazaar every year. I received the recipe at my bridal shower, and then promptly 'lost' it in packing everything to be shipped from Kentucky to California! I found it several years ago and it has become a favorite year round- both for my family, friends and neighbors!
JoAnn Marshall’s Coffee Cake
Heat oven to 350 degrees
Mix until crumbled:
3 Cups flour
1 cup white sugar
1 cup brown sugar
1 cup margerine or butter, softened
Take out 1 cup and reserve for topping
Add to remaining crumble mix:
1 tsp baking soda
1 cup buttermilk
2 eggs
1 tsp vanilla
Grease and flour pan ( either a 9x13 or 2 – 9 inch round cake pans). Pour batter in pan, and drop reserved crumble mix on top. Bake 40 - 45 minutes @ 350 degrees for round cake pans,
Bake 45 – 50 minutes @ 350 degrees for 9 x 13 cake pan.
This is wonderful for a hostess gift! The Aluminum 9 inch round pans are perfect!
Subscribe to:
Posts (Atom)